Last reviewed: 2026-07-03 > Quick answer: A bilge pump system has three failure points: the pump, the float switch, and the wiring between them. Most "dead pump" calls come down to a stuck float switch or a corroded connector, not the motor. Test the manual override first,...
Last reviewed: 2026-07-03
Quick answer: A bilge pump system has three failure points: the pump, the float switch, and the wiring between them. Most "dead pump" calls come down to a stuck float switch or a corroded connector, not the motor. Test the manual override first, then the float switch, then check every connector for corrosion. Still not sure? Put in a request at hbw.wiki/service and we'll check all three.
A Legend owner walked down to his dock last week and found his boat sitting lower than it should. Not sunk, just low. The kind of low that means water got in overnight and nothing pumped it out.
The pump itself was fine. The float switch that's supposed to wake it up wasn't. We saw three of these in a single week, all with the same root cause: a corroded connector that quietly stopped talking to the pump long before anyone noticed.
Here's the thing about bilge pumps. Everybody thinks about the pump. Almost nobody thinks about the switch and the wiring that actually make the pump do its job. That's where most real problems live, and that's what this guide covers: how the whole system works, why it actually fails, how to size and test one properly, and when it's worth calling us instead of guessing.
Who This Is For
Any boat owner who's had a bilge pump not turn on when it should have, anyone buying a bilge system for the first time, and any Legend, aluminum fishing boat, or pontoon owner on Rice Lake or the Kawarthas who wants to check their setup before it becomes a problem. If you just want the short version, skip down to "How to Test Your Bilge Pump" below.
What Is a Bilge Pump and Why It Matters
A bilge pump is one of the most important pieces of safety equipment on any boat, and it's also the one owners think about the least. Its job is simple: remove water from the lowest compartment inside the hull, the bilge, and push it overboard before it builds to a dangerous level.
Every boat takes on some water. Rain, spray, condensation, a dripping fitting, water off wet gear. It all finds the lowest point. A working bilge pump handles that quietly in the background. A failed one lets it build, usually without any warning until the boat is sitting noticeably low.
When it matters most (a leak at the dock while you're away, a hatch left cracked in the rain) the bilge pump is the only thing standing between a boat that pumped itself out overnight and one that needs to come out of the water. That's why the whole system matters, not just the pump.
What Canadian Law Actually Requires
Under Canada's Small Vessel Regulations, a watertight compartment has to have a means of pumping or bailing whenever the boat is in the water. Specifically:
- If the bilge isn't easily visible from the operating position, the boat needs a bilge pumping system or, for vessels 12 metres and under, a permanently installed automatic bilge pump connected to both a running indicator and an overriding manual switch, with both located at the helm
- An automatic bilge pump must have a minimum capacity of 0.91 litres per second (roughly 196 GPH)
- Smaller boats can legally carry a manual bailer instead, but an automatic pump gives far more protection
That's the legal floor, not a target. On Rice Lake, where boats sit in the water all season and can go unattended for days, a properly sized automatic pump with a working float switch is what we consider the real standard.
How an Automatic Bilge Pump System Actually Works
Most small to mid-size boats use three components working together.
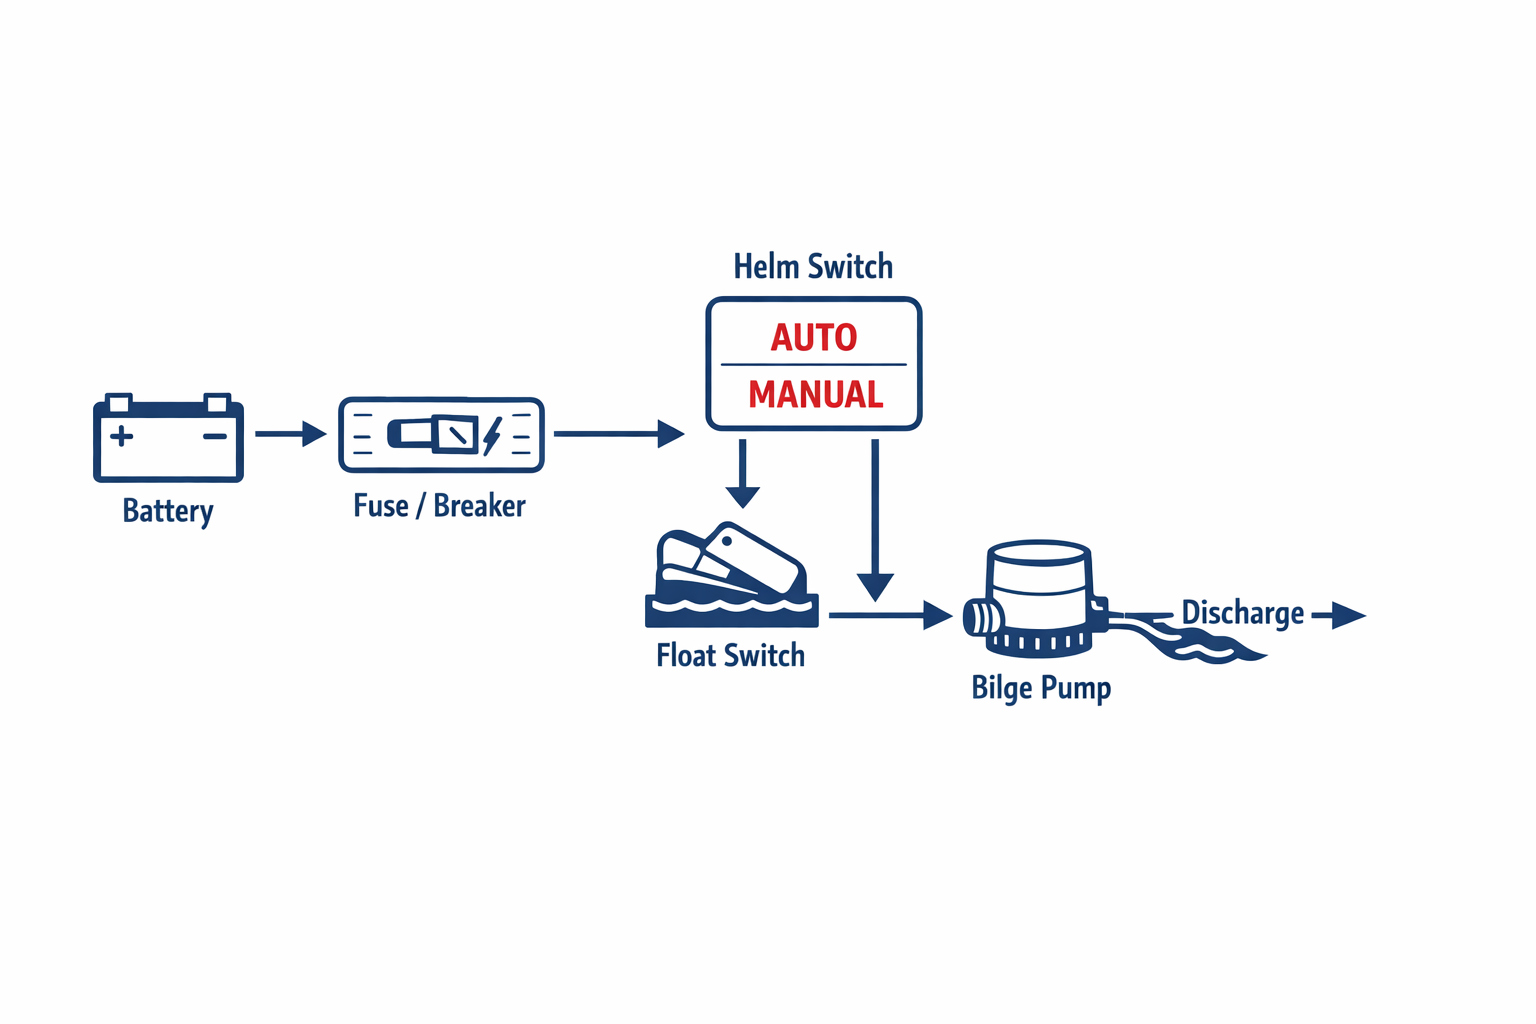
1. The Pump
An electric centrifugal submersible pump, the most common type by far, sits at the lowest point of the hull. When power is applied, an internal motor spins an impeller at high speed. The spinning impeller flings water outward and out the discharge port, and as water leaves, it draws more in through the intake. That cycle keeps running as long as power is supplied and water is present.
The pump is built to run submerged. Its motor is sealed against the water it sits in, which is exactly why running one completely dry, with no water to move, can damage the impeller and motor within seconds. Never dry-test a bilge pump.
2. The Float Switch
The float switch is what makes the system automatic. As water rises, the float arm rises with it. At a preset level, the arm rises far enough to close a circuit and send power to the pump. When the water drops, the arm falls, the circuit opens, and the pump shuts off. Simple in principle, and the most common failure point in practice.
There are two types:
| Type |
How it works |
Reliability |
| Mechanical float arm |
A physical float on a pivot closes a switch |
Reliable and easy to test by hand, can stick or jam with debris |
| Electronic sensor |
Checks pump current draw on an interval to detect water |
No moving parts to jam, some versions run the pump briefly on a timer regardless of actual water level |
For Ontario freshwater boats, mechanical float switches are by far the most common and the easiest to diagnose yourself. Keeping the bilge clean so debris can't jam the float arm is most of the battle.
3. The Wiring and Connections
Power travels from the battery through a fuse or breaker, to the helm switch, through the float switch circuit, and to the pump. Every connection along that path is a potential failure point, especially in a damp bilge.
The helm switch typically has two positions:
- Auto: the float switch controls the pump. Leave it here whenever the boat is unattended.
- Manual: forces the pump to run on demand. Use this to test the pump or to clear water you can see.
The Three Places Bilge Systems Actually Fail
In order of how often we actually see it at HBW.
Failure #1: The Float Switch (Most Common)
The float switch sticks, corrodes, or simply wears out. Debris, a jammed float arm, or a switch that's spent five years in a damp bilge will eventually fail to close the circuit. The pump looks fine in manual, because it is fine. The automatic function is what's dead.
Common signs:
- Manual override works, auto does not
- Pump runs constantly and won't shut off (switch stuck closed)
- Pump never runs automatically (switch stuck open or failed)
- Erratic on-off cycling with no obvious cause
Failure #2: Corroded Connectors
Picture drinking a milkshake through a straw with a kink in it. The straw is technically still connecting your mouth to the cup, but almost nothing gets through. That's exactly what a corroded connector does to a bilge pump circuit.
The wire is still physically there. The connection still "exists." But corrosion builds resistance inside the joint, often inside a crimped connector where you can't see it, and less and less current gets through until one day, none does. There's no spark, no warning light. The float switch just quietly stops being able to talk to the pump.
We've pulled connectors apart at HBW where a gentle tug on the wire was enough to pull it clean out of a corroded fitting. No warning, no click. Just a connection that had been failing for months.
What to look for: green or white powdery buildup on connectors, chalky-looking terminals, or a wire that feels loose when you tug it gently. If you see corrosion, that connector needs to be cut back to clean wire and replaced, not cleaned and reused. Corrosion inside a crimped connector doesn't fully clean out, and it comes back faster the second time.
Failure #3: Wiring or Fuse Problems
Chafed wire from vibration, a blown fuse, or a connection that's worked loose over a season will make the whole system look dead even if the pump and float switch are both fine. A blown fuse on the bilge circuit is often the fastest fix on this list, and the first thing to check after the float switch.
What Almost Never Happens: The Pump Motor Burns Out
The motor itself failing on its own is the least common cause on this list, and it's the last thing to check, not the first. If the manual override runs the pump normally, the motor is almost certainly fine. Start with the float switch and the connectors.
Bilge Pump Types: What's in Your Boat
Centrifugal submersible (standard on most boats): the workhorse. Sits in the bilge water, sealed motor, impeller moves water by centrifugal force. Rated in GPH. Cannot run dry. Best for general bilge duty.
Diaphragm pump: uses a flexible membrane instead of a spinning impeller. Can run dry without damage. Often used as a manual backup or where the pump can't stay submerged. Less common as a primary automatic pump on recreational boats.
Manual hand pump: required by law on some Canadian vessels and a smart backup on any boat. Works entirely without electricity, no battery, no wiring, no float switch. If everything electric fails, a manual pump buys you time. Every boat that stays in the water should have one on board.
How to Size Your Bilge Pump
Bilge pumps are rated in gallons per hour (GPH) at the pump itself, not accounting for hose length, vertical lift, or voltage drop. In real-world conditions, most pumps deliver roughly 60% of their rated capacity. A pump rated at 1,000 GPH will actually move about 600 GPH once it's installed and working against real head pressure.
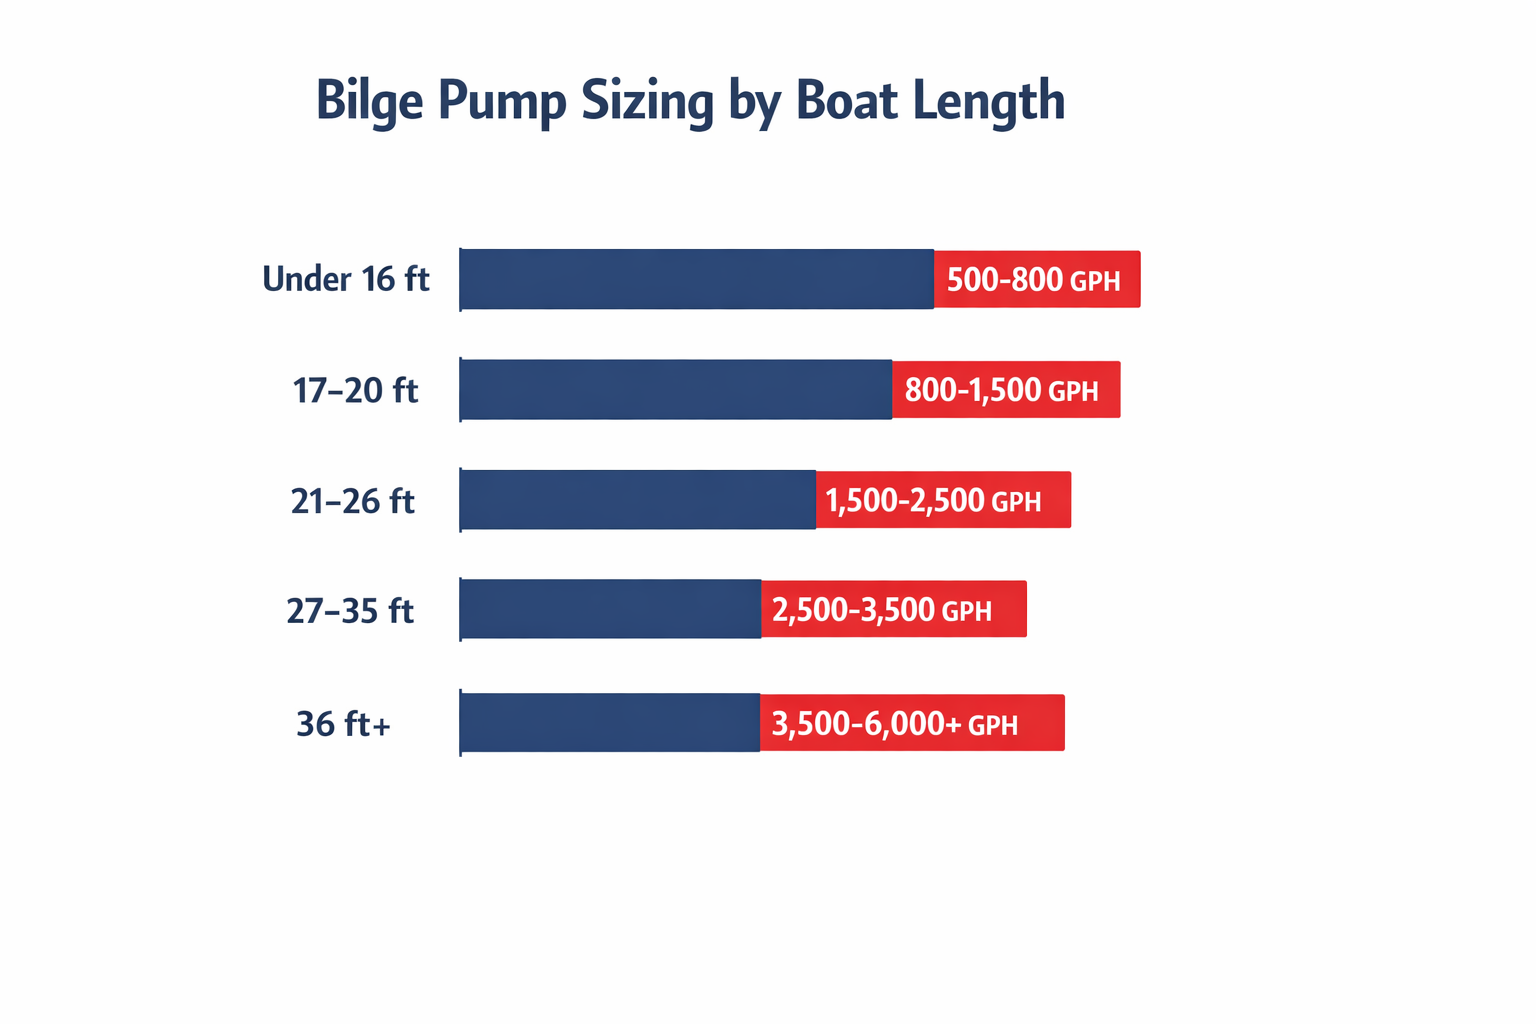
A practical sizing guide for Ontario recreational boats:
| Boat length |
Recommended capacity |
Typical setup |
| Under 16 ft |
500-800 GPH |
1 pump |
| 17-20 ft |
800-1,500 GPH |
1 pump, consider 2 |
| 21-26 ft |
1,500-2,500 GPH |
2 pumps |
| 27-35 ft |
2,500-3,500 GPH |
2-3 pumps |
| 36 ft+ |
3,500-6,000+ GPH |
3+ pumps |
When in doubt, size up. A 1,500 GPH pump on a 20-foot boat has real-world output around 900 GPH, which still handles nuisance water easily and gives you real margin in an emergency. There's no real downside to more pumping capacity.
Note on Legend Boats: Legend equips its fishing boats and deck boats with Attwood Tsunami bilge pumps rated between 500 and 800 GPH, which suits the 14-20 foot hull sizes those boats are built around.
What We See at HBW: Bilge Pump Brands
Two brands dominate the recreational market in Canada: Rule and Attwood. A third, Seaflo, has grown fast in recent years as a budget option.
Attwood (including Tsunami and Sahara lines): Attwood is the brand Legend Boats chose to equip its boats with, specifically the Attwood Tsunami series. In one independent European retailer's test of 10 bilge pumps, Attwood's Sahara pump came out on top, clearing 50 litres in under 47 seconds, close to 9 seconds faster than the next finisher. The Tsunami Mk2 uses an impeller design built to force air bubbles out of the hose, which helps prevent air-lock issues that plague some other pumps. Attwood's SteadySwitch technology on the automatic Sahara line also cuts down on unnecessary cycling, which is easier on both the pump and the battery. Warranty: 3 years. Best for primary automatic duty, and it's Legend's factory choice.
Rule Industries: one of the oldest names in bilge pumps and the brand a lot of boaters grew up with. Widely available, and the Gold Series models are generally well regarded when paired with a quality external float switch. Boater forums consistently report higher failure rates on Rule's built-in automatic switch versions compared to Attwood. The general consensus among experienced boaters is that a Rule pump paired with a separate, quality float switch outperforms the all-in-one automatic units. Warranty: 3 years. Best for manual or standard units where you control the switch separately.
Seaflo: a budget-priced alternative with a 4-year warranty, longer than either Rule or Attwood. Real-world results are mixed, adequate for nuisance water on sheltered-water boats, less proven for demanding duty cycles. A reasonable choice for a secondary or backup pump where price matters more than peak performance.
| Brand |
Key model |
GPH range |
Warranty |
Best use |
| Attwood |
Tsunami Mk2, Sahara |
500-1,200 |
3 yr |
Primary auto pump, Legend Boats' factory choice |
| Rule |
Gold Series |
500-3,700 |
3 yr |
Manual/standard with a separate switch |
| Seaflo |
Various |
500-2,000 |
4 yr |
Secondary/backup pump |
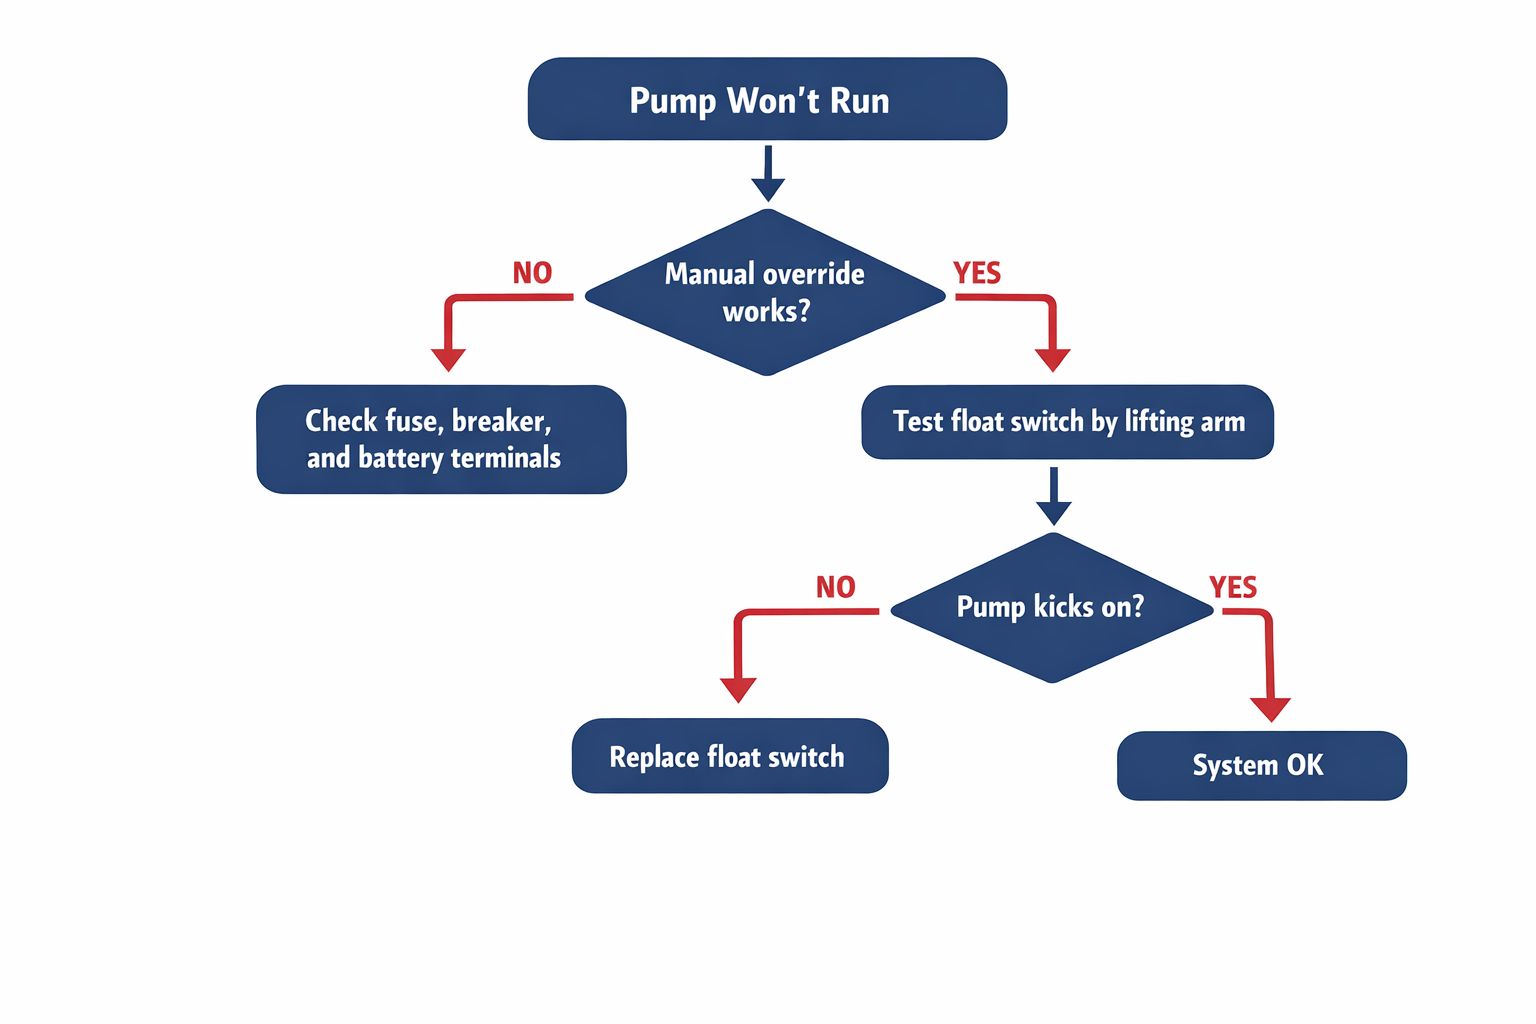
How to Test Your Bilge Pump (Without Hauling the Boat)
You don't need to pull the boat to check this. From the dock, in order:
- Test the manual override. Flip the helm switch to manual. If the pump runs and you can see or hear water moving, the pump and its direct wiring are good. Fastest step on this list, ten seconds.
- Test the float switch. With the helm switch set to auto, gently lift the float arm by hand to where rising water would push it. The pump should kick on within a second or two, usually with an audible click from the switch. If nothing happens, the problem is in the switch circuit, not the pump. (Alternative: pour a small bucket of water slowly into the bilge and watch whether the float switch rises and triggers the pump. Never hold the float arm up for more than a second or two in a dry bilge, you don't want to run the pump without water.)
- Check the fuse or breaker. A blown fuse makes everything look dead even when the pump and switch are both fine.
- Inspect connectors for corrosion. Disconnect the battery. Check every connector in the bilge circuit, at the pump, at the float switch, and in the harness back toward the helm, for green or white buildup, chalky residue, or a wire that feels loose when tugged gently.
- Check the access port. Most boats have a small access port near the transom where the pump and switch live. Open it and give the wiring a visual: chafe marks, cracked insulation, or a connector that's come apart.
Step-by-Step Troubleshooting Flowchart
Pump won't run at all, manual or auto:
- Check the fuse or breaker. Blown? Replace it.
- Check battery terminals for corrosion or a loose connection.
- Test for 12V at the pump terminals with a multimeter. Voltage present means the pump itself is likely bad. No voltage means it's a wiring or switch problem.
Manual works, auto doesn't:
- The float switch is almost always the culprit. Test by lifting the arm manually.
- Check the wiring from the helm switch to the float switch for corrosion.
- Replace the float switch if the arm lifts but the pump doesn't trigger.
Pump runs but moves little or no water:
- Check the discharge hose for kinks, air-lock, or a blockage.
- Clean the intake screen. Debris is the number one cause of reduced flow.
- Turn the impeller by hand with the pump disconnected. If it won't turn freely, replace the pump.
- Check for a partial disconnection in the discharge hose.
Pump runs continuously and won't shut off:
- Float switch is likely stuck in the on position. Test by manually moving it to the down position. If the pump keeps running, replace the switch.
- Check if the helm switch is stuck in manual.
- If the bilge is genuinely full and the pump can't keep up, you have a real leak. Find the source.
Pump cycles erratically (on, off, on, off):
- Float arm is moving too freely with boat motion. Try re-orienting the switch fore-to-aft or mounting it closer to a bulkhead.
- Check for a partial water source that keeps slowly refilling the bilge.
Common Mistakes
- Assuming a silent pump means a dead pump. Almost always the switch or a connector. Test the manual override first.
- Running the pump dry to "test" it. This can damage the impeller and motor in seconds. Test with the float arm, never a dry cycle.
- Cleaning a corroded connector instead of replacing it. Corrosion inside a crimped connector doesn't fully clean out. It comes back faster the second time.
- Using wire nuts instead of proper marine connectors. Wire nuts aren't rated for a wet, vibrating environment. They back out and corrode fast. Every splice in a bilge circuit should be a heat-shrink butt connector or a soldered joint with heat-shrink over it, never a twist-on wire nut.
- Relying only on auto and never testing manual. If you've never tested manual mode, you won't know the system is broken until the day you actually need it.
- Leaving the boat in the water all season with a loose-fitting cover. Rain pooling under a loose cover cycles the bilge pump repeatedly and drains the battery.
- Routing wiring low in the bilge. Every bilge connection should sit as high above the normal water level as practical, to cut down on corrosion exposure.
- Using check valves in the discharge line. Marine engineering guidance generally advises against check valves in bilge discharge lines. They restrict flow, can fail in the wrong position, and mask other problems. A properly routed discharge hose with a high loop is the better fix.
The Discharge Hose: The Part Everyone Ignores
A pump that runs but moves little water is often a hose problem, not a pump problem. A few rules for the discharge side:
- Use smooth-bore marine-grade hose, not corrugated, to cut friction and keep flow up.
- Route the discharge thru-hull well above the waterline to reduce the risk of siphoning back in.
- Avoid sharp bends. Gradual sweeps move water far more efficiently.
- If the discharge thru-hull could ever sit near or under the waterline depending on how the boat sits, an anti-siphon (vented) loop mounted well above the static waterline is the standard fix. It stops water from siphoning back into the bilge once the pump shuts off.
- Support the hose run every foot and a half or so to prevent chafe and movement over time.
- Never "T" two pump discharges into a single thru-hull. Each pump should have its own dedicated outlet.
Adding a High-Water Alarm: The One Upgrade Worth Making
A high-water alarm is a separate sensor mounted a couple of inches above the primary pump's trigger point. If water rises to that level, meaning the primary pump has failed or can't keep up, the alarm sounds at the helm.
This is the upgrade that catches the problem before you walk down and find your boat sitting low at the dock. The sensor runs on its own circuit, independent of the pump wiring, so it still works even if the bilge pump circuit has failed completely. Installation is straightforward: a separate float switch wired to a horn or buzzer at the helm, connected directly to the battery so it works even when the main switch is off.
If your boat sits in the water unattended for any stretch of time, this is worth the hour it takes to install.
Seasonal Maintenance: What to Do and When
Spring launch (commissioning):
- Test the manual override before the boat goes back in the water
- Lift the float switch arm manually to confirm auto trigger
- Inspect every connector in the bilge circuit for corrosion
- Check the discharge hose for kinks, cracks, or winter damage
- Clear any debris from the pump intake screen
- Replace the fuse if it looks corroded or oxidized
Monthly during the season:
- Test the manual override at the dock
- Listen for anything unusual (grinding, humming with no water moving)
- Keep the bilge clean and free of debris that could jam the float arm
Fall storage (winterization):
- Disconnect the battery before storage to stop phantom drain from a float switch cycling all winter
- Leave the drain plug out on trailered boats to prevent moisture buildup cycling the pump unnecessarily
- Note the condition of every connector before covering the boat. Any corrosion you see in the fall is worse by spring.
Annual (haul-out or bench inspection):
- Pull the pump and test it in a bucket of water
- Inspect the impeller for wear or debris damage
- Disassemble connectors and check for internal corrosion
- Consider replacing the float switch if it's been in service more than 3-4 seasons
- Carry a spare pump and a spare fuse on board at all times
Why Rice Lake and Ontario Freshwater Conditions Matter
Freshwater is less corrosive than saltwater. There's no marine growth and no salt accelerating oxidation on every fitting. That doesn't mean your bilge is a gentle environment for electrical connections, though.
Rice Lake and Trent system boats sit in the water all season, exposed to rain, spray, and condensation every day. In a covered bilge, moisture stays high all summer. Then the boat goes into outdoor shrinkwrap for six months, cycling through freeze-thaw from November through April. Each cycle expands and contracts every connection, every wire, every crimp. None of that is dramatic on its own. It adds up quietly.
That's how a float switch ends up corroded without anyone noticing, until the boat's sitting low at the dock in July.
The good news: freshwater bilge systems don't need the aggressive anti-corrosion routine that saltwater applications do. Heat-shrink connectors, a clean bilge, an annual inspection, and marine-grade wire cover most of the real risk.
Legend Boats and the 6-Year WOWranty: What It Covers
Legend Boats equips its fishing boats and deck boats with Attwood Tsunami bilge pumps (500-800 GPH), factory-installed and covered under Legend's 6-Year WOWranty, one of the most comprehensive component warranties in the recreational boat industry.
Where most manufacturers cover non-structural components for one to three years, Legend covers most other components for six full years. On the Q-Series LE and Q-Series pontoons, that coverage extends to ten years. Other Legend models, including the LE Series and Halo, carry the standard 6-Year WOWranty.
What this means for bilge pump coverage: if your Legend boat develops a factory bilge pump or float switch issue within the warranty window, that's a warranty claim, not a repair bill. It covers the pump, its switch, and related factory-installed electrical components as part of the boat's overall coverage.
The catch: warranty covers manufacturing defects and premature failure, not neglect. A connector that corroded because it was never inspected, or a pump jammed by debris that was never cleared, falls outside warranty coverage. The WOWranty is most valuable when it's backed by basic maintenance: annual inspection, a clean bilge, and testing the system every spring.
HBW is an authorized Legend dealer. If your Legend boat has a bilge pump issue inside the warranty window, bring it to us. We'll diagnose it, document it, and handle the warranty claim so you're not chasing it yourself.
What HBW Checks Before We Call It Fixed
When a bilge pump comes across our bench, we don't just swap the part that looks obviously bad. We check all three points every time:
- Pump output. A fresh water test to confirm actual flow, not just motor spin.
- Float switch. Trigger point, full range of motion, and a click test.
- Every connector from pump back to battery. Corrosion check and a pull-test on each crimp.
We also check the manual override circuit separately from the automatic circuit. It's common to find one working and not the other, and a boat with a bilge pump that only works in manual mode isn't actually protected when you're away from the dock.
When to Call HBW
If you've tested the manual override and the pump runs, but the float switch test does nothing, or you see visible corrosion at any connector, that's a same-visit fix for us and not worth troubleshooting further on your own. Same goes for a boat that's already taken on water once. Once a bilge system has let you down one time, it's earned a real inspection, not just a part swap and a guess.
Put in a request at hbw.wiki/service and we'll check the pump, the switch, and the wiring in one visit.
Frequently Asked Questions
Why didn't my bilge pump turn on when there was water in the boat?
The most common cause is a float switch that's stuck, worn out, or no longer getting power through a corroded connector. The pump motor itself is usually fine. Test the manual override at the helm first. If it runs, the motor is good and the problem is in the float switch circuit.
What's the difference between the manual and automatic bilge pump switch?
Manual runs the pump on demand from the helm, useful for testing or clearing water you can see. Automatic relies on the float switch to trigger the pump on its own, which is what protects the boat when you're not on board.
Can I test my float switch without hauling the boat?
Yes. With the helm switch set to auto, gently lift the float arm by hand to where rising water would push it. The pump should start within a second or two. If it doesn't, the problem is in the switch circuit.
Is it safe to run my bilge pump dry to see if it works?
No. Bilge pumps are built to move water, and running one dry can damage the impeller or motor within seconds. Test with the float arm and a small amount of water, not a dry run.
Why do bilge connections corrode even on a freshwater lake?
Freshwater is less corrosive than saltwater, but a damp bilge, condensation, and outdoor winter storage still expose connectors to moisture all season. Corrosion inside a crimped connector builds slowly and often isn't visible until you pull the connector apart or it fails outright.
How often should I test my bilge pump?
At minimum, test the manual override every time you're at the dock, and do a full float switch and connector check at spring commissioning. If your boat sits in the water all season, test the whole system monthly.
My pump runs but not much water comes out. What's wrong?
Start with the discharge hose: check for kinks, a partial disconnection, or a blocked thru-hull. Then clean the intake screen, since debris is the leading cause of reduced flow. If both are clear, the impeller may be worn or damaged.
What size bilge pump do I need for my boat?
As a starting point, 500-800 GPH under 16 feet, 800-1,500 GPH for 17-20 feet, and 1,500-2,500 GPH for 21-26 feet, with two pumps once you're past about 20 feet. Real-world output runs about 60% of the rated number, so when you're between sizes, size up.
Does my Legend Boats warranty cover the bilge pump?
Yes. Legend's 6-Year WOWranty covers most components, including factory-installed bilge pumps and related electrical parts, for six years from purchase. On the Q-Series LE and Q-Series pontoons, that stretches to ten years. Bring your Legend to HBW. We're an authorized dealer and can handle the warranty claim directly.
Ready to Get This Checked?
If your bilge pump has already let you down once, or you just want to know it'll actually work before you need it, we'll check the pump, the float switch, and every connector between them while you wait at the dock.
Phone: 905-342-2153
Service: hbw.wiki/service
Website: harrisboatworks.ca
Related guides:
Sources
