Quick answer Boat electrical problems are boring until they aren't. Most freshwater electrical issues come from one of five root causes: corroded terminals from using automotive-grade connectors instead of marine-grade, undersized or missing fuses that let small shorts become...
Quick answer
Boat electrical problems are boring until they aren't. Most freshwater electrical issues come from one of five root causes: corroded terminals from using automotive-grade connectors instead of marine-grade, undersized or missing fuses that let small shorts become large fires, a bilge pump that doesn't actually work because its float switch is stuck, a battery switch left ON during storage that lets a parasitic draw kill the battery, or amateur wiring done with the wrong tools. A 15-minute seasonal inspection catches all five before they become expensive. This guide walks through what to check, what to fix yourself, and when to call a marine electrician.
Why Ontario freshwater is its own thing
Freshwater is gentler on marine electrical systems than saltwater, but it isn't free of damage. The Ontario boating environment has its own challenges: high humidity through the season, condensation cycles every cool night, freeze-thaw stress on connections during shoulder seasons, vibration from running across chop, and mice or other rodents making homes in stored boats over winter. Add ethanol-blend fuel vapors near electrical components and a typical Ontario boat sees more electrical stress than its automotive equivalent ever does.
The good news: marine-grade components and a careful seasonal inspection handle all of it.
The 15-minute seasonal inspection
Run this checklist at spring launch and again in mid-summer if your boat sees heavy use.
1. Battery terminals and cables
Open the battery compartment. Look for white or green crystalline corrosion around the terminal posts. Any visible buildup means the connection has resistance, which means voltage drops, which means everything downstream is working harder than it should.
What to check:
- Tightness of the terminal bolts (snug, not over-torqued)
- Corrosion (any visible buildup needs cleaning)
- Cable insulation (no cracks, no exposed copper, no chafing where the cable passes through a bulkhead)
- Battery hold-down strap secure
Fix: clean with a brass-bristle terminal cleaner, apply marine-grade dielectric grease to the cleaned terminal, retighten.
2. Battery switch
Most boats have a marine battery switch (off / 1 / 2 / both) within easy reach of the helm. Confirm it works in all positions, then leave it OFF whenever the boat is not in use, even for an overnight stay.
The trap: leaving the switch ON during storage. A bilge pump, a stereo memory circuit, a fishfinder, or even a clock will draw a tiny current 24/7. Over a week of storage, that drains a healthy battery enough to need a recharge. Over a month, it kills a battery.
Fix: switch OFF for any storage longer than 24 hours. Verify with a multimeter that no current flows when the switch is off.
3. Fuses and breakers
Locate the boat's fuse block or breaker panel. Each circuit (bilge pump, lights, accessories, electronics) should be protected by an appropriately-sized fuse.
What to check:
- Each fuse is the correct amperage for the circuit (your boat's wiring diagram has the values, or any marine dealer can advise)
- No "jumper wires" or oversized fuses bypassing protection
- The fuse block itself is clean and tight
- Visible labeling on each circuit (some marinas do this professionally, owners can add their own label tape)
Fix: replace any incorrect fuses with proper marine-grade ones. NEVER bypass a fuse with a jumper. The fuse exists to prevent a fire.
4. Bilge pump and float switch
The bilge pump is the most under-tested piece of safety equipment on most boats. It sits dormant for months at a time, then needs to work perfectly when water enters the boat.
What to check:
- Bilge has been wiped clean (debris in the bilge fouls float switches and impellers)
- Float switch moves freely up and down (lift it manually, the pump should activate)
- Pump discharge hose is clear and properly routed to the through-hull fitting
- The pump runs smoothly when activated, no unusual noise
Fix: if the float switch is stuck or the pump doesn't run when the float is raised, replace it. A bilge pump kit is typically $80-$150 in parts.
This is a safety item, not a maintenance item. A failed bilge pump is how boats sink at the dock during heavy rain.
5. Wiring inspection
Visually inspect any wiring you can see, especially around connections to the helm, the battery compartment, and through-bulkhead routings.
What to check for:
- Cracked or sun-faded insulation
- Bare copper where insulation has worn through
- Connections wrapped in electrical tape (a temporary fix, not a permanent solution)
- Automotive-grade plastic crimp connectors (NOT marine-grade, will corrode)
- Routing through areas where the wire can chafe or be pinched
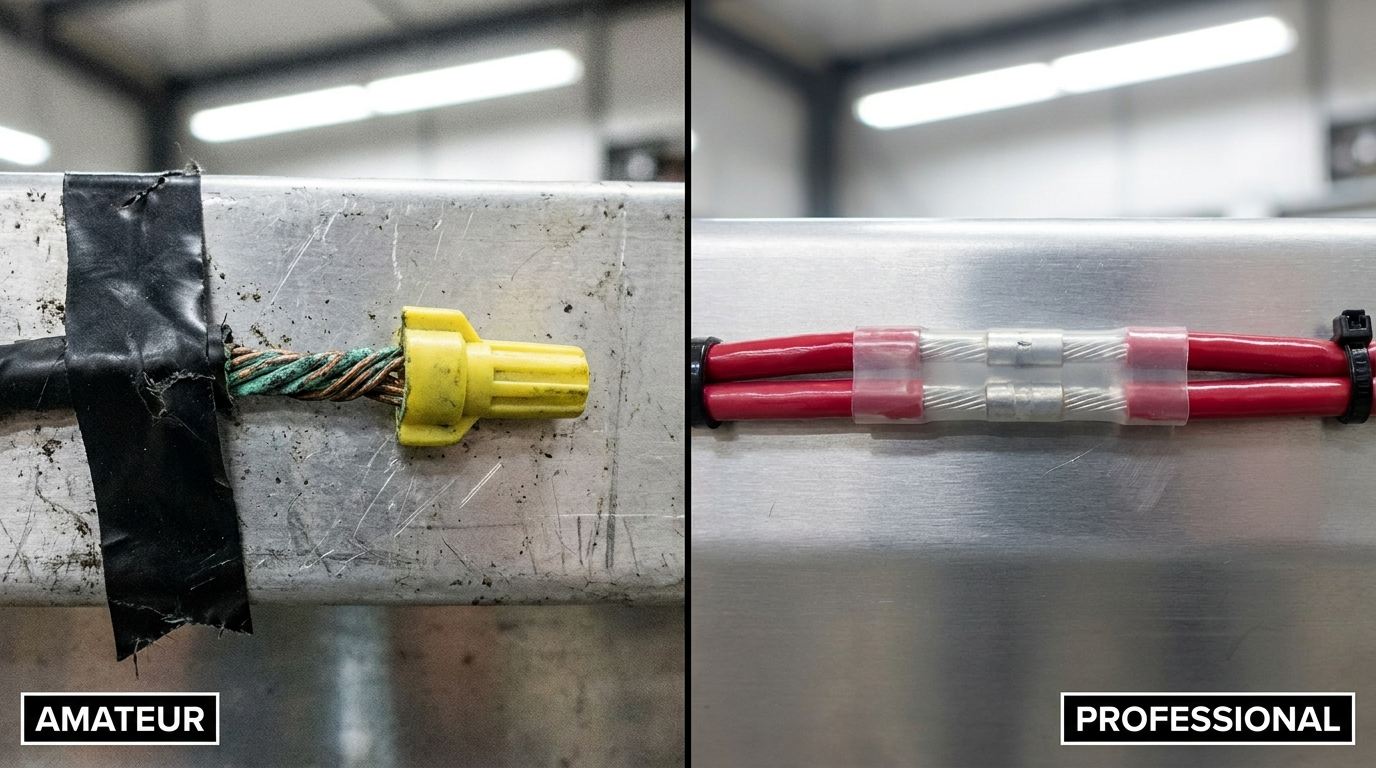
Fix: replace any connection that uses automotive-grade terminals with marine-grade tinned-copper terminals and adhesive-lined heat-shrink butt connectors. The right tool for the job costs $5-$10 more per connection and lasts 10+ years.
This is the single most common pattern we see when diagnosing intermittent electrical issues at our service shop. Amateur wiring with the wrong terminals creates resistance, the resistance creates voltage drops, and the voltage drops create faults that look mysterious until you trace them back to a corroded crimp.
You can build a live CAD quote for your repower online at Mercury Repower Centre.
For the broader battery conversation, our Mercury Boat Battery Guide covers selection and care in more detail.
The marine-grade vs automotive-grade trap
Here's the part most owners don't know: a marine-grade tinned-copper terminal looks almost identical to an automotive crimp connector at first glance. The differences:
- Copper conductor: marine is tinned (silver coating) to resist corrosion. Automotive is bare copper. Bare copper in a humid boat develops green oxidation within a year.
- Heat-shrink seal: marine connectors include adhesive-lined heat-shrink that seals the connection from moisture. Automotive crimps have a plastic sleeve only.
- Wire gauge tolerance: marine connectors are sized to specific marine wire gauges, which are thicker than automotive equivalents.
- Price: marine connectors cost roughly $0.50-$1.50 each. Automotive crimps cost $0.10-$0.30 each.
The $5 saved by using automotive parts on a marine project costs hundreds of dollars in diagnostic time later. We have seen this exact pattern dozens of times.
What you can do yourself vs when to call a pro
Safe DIY:
- Battery terminal cleaning and dielectric grease application
- Fuse replacement (right-amperage, marine-grade)
- Bilge pump float-switch testing
- Visual wiring inspection
- Adding marine-grade terminals to clean new wiring
Call a marine electrician for:
- Anything involving shore power (the AC side of a marine system is unforgiving)
- Battery charger installations or replacements
- New circuit additions (fishfinders, trolling motors, stereos that involve drilling holes or new fuses)
- Anything where you're not sure what the existing wiring does
- ABYC compliance work (the marine industry standard for safe wiring)
The line is: if it's working and clean, an owner can maintain it. If it's broken, dirty, or needs new circuits added, get a pro to do it right.
Shore power, briefly
Most Rice Lake and Kawartha boaters don't run shore power on their boats, but if you have a larger cruiser with AC outlets and a marina slip with 30-amp service, the rules are different:
- Shore power systems require galvanic isolators or isolation transformers to prevent stray current corrosion
- A reverse-polarity indicator should be visible at the panel
- GFCI protection on all AC outlets is mandatory in marine applications
- ABYC compliance is not optional, it's the safety baseline
If you have shore power and aren't 100 percent sure your boat's setup is compliant, have a marine electrician inspect it. This is an area where a small mistake can be fatal.
What we see at HBW
The single most common electrical pattern we diagnose is intermittent SmartCraft faults that trace back to a corroded amateur wiring connection somewhere in the boat. Customer brings in a Mercury that "keeps throwing different alarms," we hook up the diagnostic, the faults are real but they come and go. Tracing them back, the issue is usually a $5 crimp connector behind the console, installed by a previous owner, that has corroded enough to create a voltage drop.
The repair: cut out the corroded connection, install proper marine-grade terminals and heat-shrink, retest. Total parts cost: $10. Labour: 30-60 minutes. Total job: $150-$200. Compared to what owners spend chasing the gremlins, this is cheap and final.
For a structured electrical inspection or to fix a known issue, our service intake is at hbw.wiki/service.
For engine repairs, we only service Mercury and Mercruiser.
Sources
- ABYC E-11 marine electrical standards
- Transport Canada Construction Standards for Small Vessels (TP 1332)
- Mercury Marine electrical installation guidelines (dealer technical reference, 2026)
- HBW service shop records, 2018-2026
- Transport Canada - Safe Boating Guide (TP 511) - Federal guidance on small-vessel electrical safety and required equipment.
- Mercury Marine Canada - Manufacturer guidance on rigging, batteries, and ignition-protected equipment.
About the author
Reviewed by the Harris Boat Works service team. HBW handles Mercury and Mercruiser service from Gores Landing on Rice Lake. For engine repairs, we only service Mercury and Mercruiser. About Harris Boat Works.
Ready to price it out? Build a live CAD quote for your repower online at the Mercury Repower Centre.
